Friday, October 7, 2016

Pumpkins in the Night


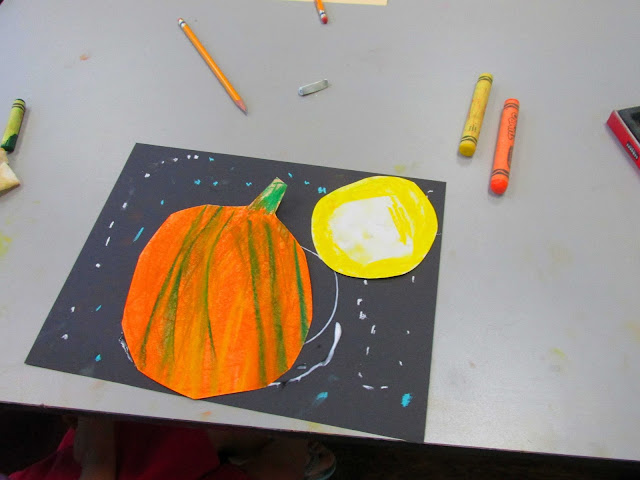
It to is October.  There are lots of fun pumpkin art projects.  With the fours this week, we used crayon to draw our pumpkins.  It was a step by step guided drawing.  We add some yellow, orange, and green crayon to our pumpkins.  I start early talking about seeing the variety of colors and shades in nature. Then we chalked them and rubbed the chalk into the paper.  I hold up two fingers and tell them that we are smearing the chalk with just two fingers, otherwise many of them would smear with both hands.  Some still do!!! Honestly, there was chalk every where.  Some of the students went home with pretty orange looking smudged clothes.  Thankfully chalk washes out.


  I cut their pumpkins out quickly while they used a wipe and worked on  cleaning their hands and their area up a bit.  I gave them a piece of black construction paper and went around with the glue.  They added their pumpkin and then used white and blue chalk to add stars.  I also discuss how the stars are all over the sky and can by very random looking.  Many of them want to add a line of stars at the top of the paper. With the stars, I show them how to press and mark.  I have found that most of the fours will just beat the chalk on the paper unless I give some instructions.  I also tell them that if they beat the chalk, then they are through working on their pictures.  I do give some grace and repeat the instructions, but a four year old can destroy the soft chalk pretty quickly if they are hammering it on the table.


Next year I might grind up a bit of yellow chalk to to sprinkle on their papers as well.  One of the girls got some of the yellow on her paper and I really thought it was a nice touch.  I cut out moons and let them add some yellow chalk to the moon and  then glue it in the night sky.


 Our art concept this time was drawing big and using our space. I also like to introduce different materials to the kids early on. The chalk is messy but  they are so much more comfortable with the materials later on if I give them some opportunities in preschool. I find their art to be enchanting. 
Monday, October 3, 2016

Creepy Spiders

The four year old students did a September spider art project.  On their papers we used oil pastel to draw horizontal and vertical lines and then two diagonals from corner to corner both ways.  We add 3 to 4 circles in the middle of the paper.  They each got a small brush and a watercolor well.  I gave them liquid watercolor one color at a time.  They had to use all of the color in the well before I brought more color.  Everyone had a wipe to clean their brushes between colors.  They painted the entire page any  way they chose.

 We discussed spiders.  How many legs?  What do they eat?  How many eyes can they have?  Why September is a big spider month with the adults maturing and laying eggs in egg sacks? We discussed how important spiders are in keeping down the bug population?  Why don't we touch spiders?

Their projects dried and during the next session, I painted one hand black and used their hand prints to make a big black scary spider. We added six eyes just to make our spiders creepy and a piece of yarn for a guide line.   With my extra time, we sang the Itsy Bitsy Spider  and acted out "Little Miss Muffet".  They really loved acting out the nursery rhyme and everyone wanted to participate.

I always elicit language from them by making them tell me one thing that we did in the lesson.  This part of the lesson can be super short if we are out of time or drag it out a little bit if their 30 minutes of time is not yet over. 


Apple Prints


I am back in school and for my first  art preschool class in the threes,  I pulled an apple out of my bag for discussion.  I asked them if they had ever picked apples.  This is also good time to talk about the things that we can make from apples (cider, juice, pies, cakes, pastries).  Color of apples and the shape of the apple can also be discussed.

  I used a small knife and  an easily carried flimsy cutting board to slice the apple in half. We discussed  the apple skin, seeds and the stem.  I gave each of them a small paper plate.  We dipped half the apple in red paint to make a print in the middle of the plate.  I added a stem with a black sharpie.  We then dipped thumbs in a combination of dark green and yellow paint to make a couple of leaves by the stem.

I give each child a wipe to clean their thumbs and hands.  I say "clean fingers first and then the table."  We stand up and push up chairs.  We picked up the apples with both hands and got in line by the door.  I took them to the hallway and had them stay in line and turn and face the wall.  When everyone was in hallway, they put their projects down.  I went to the other end of the line and sent them back to the carpet one by one.

Once we were on the carpet I cut up the other part of the apple for them to taste.  While they ate the apple, I played Way Up High in the Apple Tree,  a song from the Learning Station.  At the end of the lesson, each student came up to me and told me their name (since it is the first of the year) and  what we painted today.  I always give stamps or stickers as a reward in preschool art.  If they misbehave or have trouble listening, then they are not rewarded.  Having them tell me their names as the first of the year, helps me quickly learn all of the preschool kids.  After the first month, I usually have learned everyone's name even though a see a couple of hundred children for art each week.  

Rainbow Prints in Preschool


 In this lesson with the preschool 4's, I introduced primary colors.  I started with painting a red bow on the white board and skipping a space and painting a yellow bow.  I mixed yellow and red together to create orange and added it to my rainbow.  I skipped another space and added the blue bow.  I mixed the yellow and blue on the board to create green.  I mixed the red and the blue to create a purple but it was not a true color.  I told them that the dark blue in the rainbow is called indigo and that the purple in the rainbow is really a violet.

I gave each of them a blue crayon and showed them how to make raindrops.  They also got a few cotton balls to pull apart to make clouds. While they worked on the raindrops and clouds, I called them one by one to my table.  I painted a rainbow on the table and we pressed their paper onto the rainbow to make a print.  It was a magic moment when we pulled each paper off of the table to see the newly printed rainbow.  I went around and gave each student some glue so they could glue their clouds onto their rainbows.

At the end of each lesson I ask each student to tell me something that we did during the lesson.  I love how art can introduce new vocabulary as well as give the students an opportunity to communicate.  My classes are 30 minutes long and I average about 12 four year old students in each session.

Materials:  paper 8 1/2 by 11
                  tempura paint
                  large paint brushes
                  blue crayons
                  cotton balls
                  glue